Did you know that nearly 95% of pond leaks can be fixed without draining your entire water feature? If you’ve noticed your pond’s water level dropping faster than evaporation can explain, you’re likely facing a liner issue. I’ve tackled quite a few leaky ponds myself, and while it feels overwhelming at first, most repairs are simpler than you’d think. With the right approach and a few basic supplies, you’ll have your water feature back to normal before your fish even notice the problem.
Some of the links in this article may be affiliate links. If you make a purchase through these links, we may earn a small commission at no extra cost to you. Thank you.
Signs Your Pond Liner Is Leaking
How do you know if your pond liner is actually leaking, and not just experiencing normal water loss? This can be tricky, but there are a few telltale signs to watch for.
First, check your water level drop. Normal evaporation usually causes 1-2 inches of water loss weekly during summer months. If you’re losing more than 2 inches in 24 hours, you’ve likely got a leak on your hands.
Another clue might be noticing the water level stabilizing at a certain point. When this happens, I think you’ve found your leak’s location – it’s probably right at that water line.
Common Leak Locations in Pond Systems
Leaks in pond systems often play a game of hide-and-seek with even the most attentive pond owners. You might be surprised where these troublemakers typically hide.
The skimmer box is perhaps the most common culprit – check around the faceplate where it meets the liner.
Waterfalls can develop leaks where the liner edges aren’t properly secured.
I’ve found that hose connections are sneaky leak spots too, especially where they attach to pumps or filters.
Don’t forget to inspect the actual liner surface for tears caused by sharp rocks or animal activity.
DIY Methods for Locating Hidden Leaks
Tracking down those sneaky hidden leaks in your pond can feel like detective work. I’ve found that patience is really the key here – sometimes you need to let nature reveal the problem rather than forcing it.
| Method | Works Best For | Difficulty |
|---|---|---|
| Milk technique | Pinhole leaks | Easy |
| Water level test | Edge leaks | Medium |
| Dye tracing | Hidden cracks | Advanced |
Try the milk method first – just add a small amount of condensed milk near suspected areas and watch where it gets pulled. Perhaps the simplest approach is just letting water levels drop naturally until they stabilize, showing you exactly where your leak lives.
Essential Tools for Pond Liner Repair
Successful pond liner repair doesn’t require a professional’s toolkit, but having the right equipment on hand can make the difference between a quick fix and a frustrating afternoon.
I think most repairs can be handled with just a few essential items.
You’ll definitely need a good pond liner repair kit with patches, adhesive, and primer. A pair of sharp scissors, clean rags for drying the surface, and perhaps a roller to press patches firmly in place are also must-haves.
For smaller holes, a quality waterproof sealant like Liquid Rubber NeoPond works wonders—I’ve seen amazing results with it.
Step-by-Step Guide to Patching Small Holes
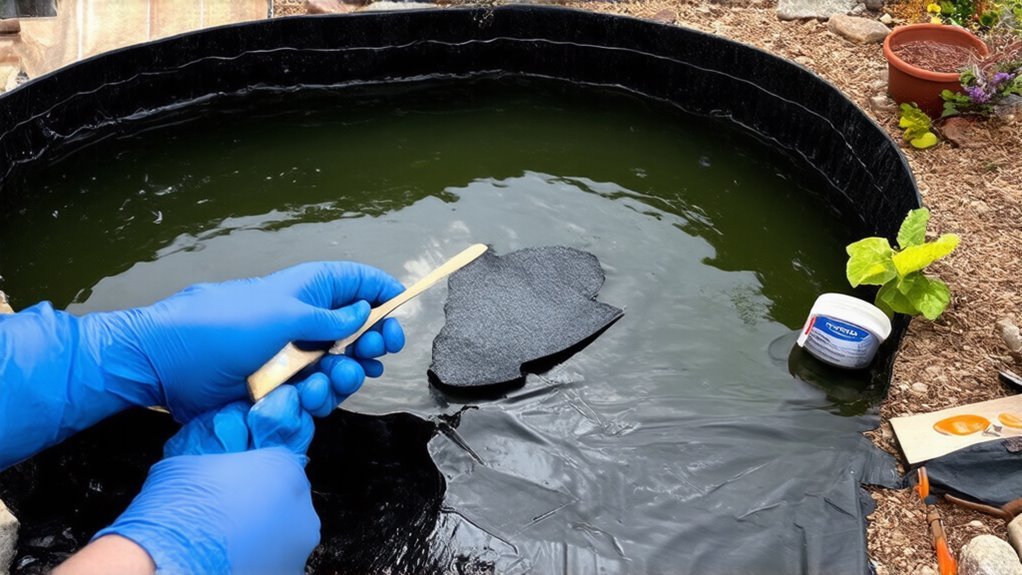
Patching small holes in your pond liner isn’t complicated if you follow a systematic approach.
I think most people overthink the process, when really it’s quite straightforward.
- Drain water just below the leak location
- Clean and thoroughly dry the damaged area (this is perhaps the most essential step)
- Apply primer if your repair kit includes it
- Press patch firmly over the hole, extending at least 2 inches beyond damage
- Roll out air bubbles with a small roller or smooth object
Once you’ve completed these steps, wait about 24 hours before refilling.
Trust me, patience pays off here.
Sealant Solutions for Concrete and EPDM Liners
When it comes to fixing leaks in concrete or EPDM pond liners, using the right sealant makes all the difference between a temporary patch and a long-lasting solution. I think Liquid Rubber NeoPond is perhaps your best bet for smaller tears, as it’s completely fish-safe once cured.
| Sealant Type | Best For | Curing Time | Fish Safety | Durability |
|---|---|---|---|---|
| Water-based | Small holes | 8 hours | Excellent | 3-5 years |
| Epoxy | Concrete cracks | 24 hours | Good | 5-7 years |
| Butyl tape | Edge seams | Immediate | Very good | 2-3 years |
| EPDM patches | Medium tears | 12 hours | Excellent | 10+ years |
| Silicone | Emergency fixes | 4 hours | Fair | 1-2 years |
Remember to completely dry the area before application. Most failures happen because people rush this step.
When to Consider a Full Liner Replacement
While sealants and patches can solve many pond liner issues, there comes a point where pursuing repairs feels like putting band-aids on a sinking ship.
Sometimes, it’s better to start fresh with a complete replacement.
Sometimes a fresh start with a complete replacement is the wisest choice for long-term pond health.
You should consider replacing your pond liner when:
- It has multiple tears or holes throughout the material
- The liner is over 15-20 years old and showing signs of brittleness
- Repairs keep failing despite your best efforts
- The cost of repeated repairs exceeds replacement value
- Your liner shows significant UV damage or deterioration
I think most pond owners eventually face this decision.
It’s a bigger project initially, but often provides peace of mind for many years to come.
Preventative Measures to Protect Your Liner
After spending time and money repairing a leaky pond liner, you’ll definitely want to prevent future problems from occurring.
I think the simplest way to protect your liner is by adding pond netting – it keeps out predators like herons that might puncture your liner while hunting.
Remove any sharp rocks near your liner, as these often cause those frustrating micro-tears.
Perhaps the most overlooked step is properly securing the edges of your liner, which prevents splitting.
Regular maintenance checks can spot potential issues before they become disasters.
Seasonal Maintenance to Extend Liner Lifespan
Throughout the changing seasons, your pond liner faces different challenges that can affect its durability.
I’ve found that regular maintenance checks are absolutely worth the effort – they might just save you from a costly replacement down the road.
- Remove fallen leaves promptly in autumn to prevent decomposition damage
- Check for ice pressure points during winter freezes
- Inspect liner exposure at edges in spring when water levels fluctuate
- Apply UV protectant to exposed liner sections before summer heat
- Trim back aggressive plant roots that might penetrate the liner
Perhaps the most overlooked aspect is winter preparation.
Your liner contracts in cold temperatures, making it more vulnerable to tears.
Fish-Safe Repair Products and Techniques
The three most important considerations when repairing pond liner leaks are effectiveness, durability, and fish safety.
When selecting repair products, I think it’s essential to choose those specifically designed for aquatic environments.
Liquid Rubber NeoPond Waterproof Sealant is perhaps your best option for small holes—it’s water-based with ultra-low VOCs and completely safe once cured.
Remember to relocate your fish during repairs though.
For patches, circular shapes work better than square ones to prevent corner lifting.
And always clean the area thoroughly before applying any adhesive.
Your fish will thank you for taking these extra precautions.
Frequently Asked Questions
How Soon Can I Add Fish After Applying Sealant?
Like Noah waiting for dry land, you’ll need patience. Wait at least 8 hours after applying sealant, allowing it to fully cure before reintroducing your fish to their home.
Can I Repair a Liner Without Fully Draining My Pond?
Yes, you can repair your liner by only draining to the leak level. Clean and dry the area thoroughly, then apply patch or sealant according to product instructions.
What Causes Bubbles Under My Pond Liner?
You’ll likely see bubbles under your liner due to trapped gases from decomposing organic matter, groundwater pressure, or air pockets that formed during installation. They need addressing to prevent damage.
How Much Overlap Should I Leave When Replacing a Liner?
Like a safety net beneath a tightrope walker, you’ll need at least 12-18 inches of overlap when replacing your pond liner, ensuring adequate coverage for folding and securing along the edges.
Will UV Exposure Damage My Patched Repairs Over Time?
Yes, UV exposure will gradually degrade patched repairs. You’ll need to shield your patches with rocks or plants, or use UV-resistant sealants designed specifically for pond liners.