When you're tackling leak repairs, it's crucial to prioritize safety and have the right tools on hand. Start by watching tutorials that emphasize essential safety measures like wearing protective eyewear and ensuring proper ventilation.
Some of the links in this article may be affiliate links. If you make a purchase through these links, we may earn a small commission at no extra cost to you. Thank you.
Look for videos demonstrating the use of a propane torch and a 4-in-1 pipe cleaner for soldering copper pipes. To pinpoint leak sources, keep an eye out for water stains or consider using a moisture meter for accuracy.
When it comes to replacing pipes, educate yourself on press fittings and soldering techniques through detailed tutorials. Seek out videos offering a step-by-step guide on cleaning, applying flux, and soldering joints effectively.
By following these steps, you'll be well-equipped to handle leak repairs confidently and efficiently.
Essential Safety Precautions
Ensuring safety is our top priority during leak repairs. It's crucial to wear safety glasses to protect our eyes from potential hazards, especially during soldering. Metal particles can become airborne, risking our vision. Safety glasses greatly reduce this danger.
When handling hot pipes, using a wet rag is essential. Wrapping it around the piping helps prevent burns and ensures a safer soldering process. This simple step significantly improves safety.
Proper ventilation is also key. When using a propane torch, harmful fumes can accumulate quickly. To mitigate health risks, ensure good ventilation by opening windows or using exhaust fans. This is vital for maintaining a safe workspace.
Tools and Equipment Needed
Having the right tools and equipment is crucial for fixing leaks effectively. A propane torch with a self-igniter is essential for soldering copper pipes, ensuring strong and leak-proof joints. To prep the pipes, a versatile 4-in-1 pipe cleaner is needed to handle different sizes and ensure a clean surface for soldering.
Applying flux, which helps the solder bond securely to the pipe, requires an acid brush. For a clean and properly adhered surface, using 120 grit emery cloth is recommended to roughen and clean the pipe before soldering. Plumbing solder is essential as it melts and forms a watertight seal in the joint.
Channel lock pliers are necessary for gripping and turning pipes to create tight and secure connections. Before starting any repair, be sure to turn off the main water supply to prevent flooding accidents.
With these tools at hand, replacing old pipes with new ones and fixing leaks becomes a straightforward task.
Identifying Leak Sources

Now that we've the necessary tools and equipment, let's focus on finding the sources of leaks in your plumbing system. Start by checking for water stains or puddles near pipes, joints, or fixtures as these visible signs can indicate where a leak is coming from.
Also, examine your pipes for signs of corrosion, rust, or mineral buildup, which could signal a leak even if there's no visible water.
Listening carefully is key. Be attentive to any sounds of running water or hissing noises when no faucets are in use. These noises often point to a hidden leak within walls or under floors.
To pinpoint these hidden leaks more precisely, utilize a moisture meter. This device helps locate areas with excessive moisture behind walls or ceilings, guiding you to the source of the leak.
Another effective technique is the dye test. Simply add a few drops of food coloring to the water and observe its movement to identify the exact location of the leak.
Pipe Replacement Methods
When it comes to efficiently replacing damaged pipes, knowing the right methods and tools is crucial. Press fittings are a fantastic option, especially when dealing with wet pipes or aiming for a flame-free solution. These fittings enable quick and safe installation of new pipes without the need for a torch. Here's a step-by-step guide on how to effectively replace pipes using press fittings:
Press fittings are the go-to choice for creating secure, flame-free connections, even on damp pipes. Before crimping the fittings onto the pipes using hydraulic press tools, it's essential to test-fit them to ensure proper alignment and tightness. This simple step can prevent future leaks and ensure a reliable connection.
Hydraulic press tools are indispensable for securely crimping press fittings onto the pipes. They're user-friendly and result in long-lasting connections that you can trust. These tools make the installation process smooth and efficient, saving you time and effort in the long run.
Always remember to test-fit the press fittings before the final installation. This step is crucial in confirming that the fittings are aligned correctly and tightly secured. By double-checking the connections, you can avoid potential issues down the line and ensure a leak-free system.
For those considering soldering as an alternative, it involves heating the joint with a torch and using solder to create a watertight connection.
In the next section, we'll delve deeper into the specifics of soldering for pipe replacement.
Step-by-Step Soldering Instructions
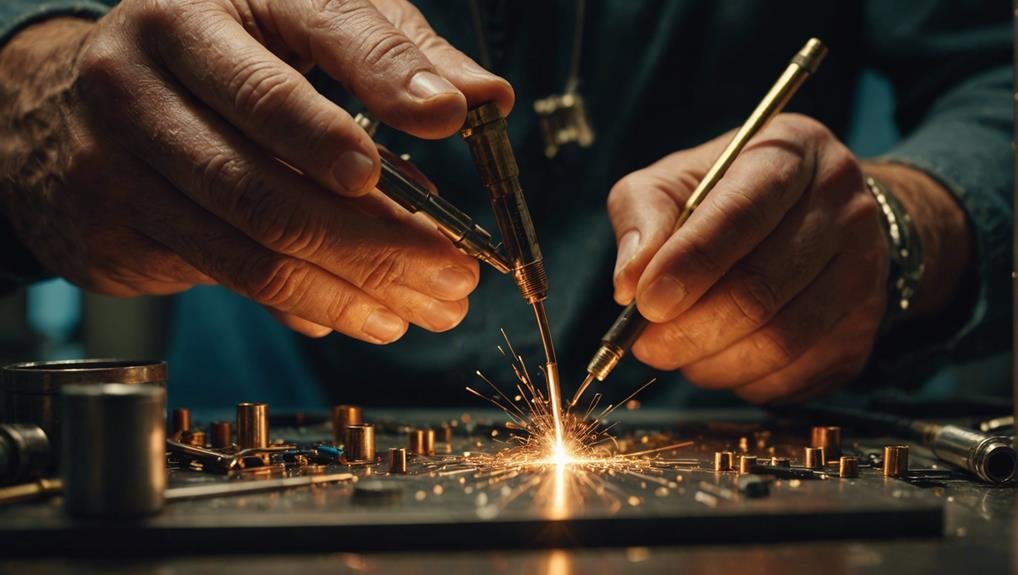
Let's dive into a detailed guide to master the art of soldering pipes for leak-free connections every time. Start by watching video tutorials to learn proper cleaning techniques. Thoroughly clean the pipe and fitting to remove dirt and oxidation, ensuring the solder will adhere correctly.
Next, understand the importance of flux. Flux is a chemical cleaning agent that aids in the soldering process by preventing oxidation and promoting a strong bond. Apply a thin, even layer of flux to both the pipe and fitting for optimal results.
Using a propane torch, evenly heat the joint. It's crucial to apply the right amount of heat—too much can damage the pipe, while too little won't melt the solder effectively. Aim for consistent, even heat until the flux starts to sizzle.
Now, touch the solder to the heated joint. It should smoothly flow into the connection. If not, the joint may not be hot enough. Allow the solder to fill the joint entirely, ensuring a secure connection.
Practice these steps for successful soldering results.
Conclusion
Now that you've learned about safety precautions, necessary tools, leak sources, pipe replacement methods, and soldering instructions, you're almost set to fix that leak.
The key now is to put your newfound knowledge into practice. Whether you nail it on the first try or need a couple of attempts, the confidence to tackle leaks is in your hands.
It's time to take the plunge and apply what you've learned. The ball is in your court, and the next step is yours to take.